 FLASH SALE: EVERYTHING HALF PRICE! LIMITED TIME ONLY!
 Sale!
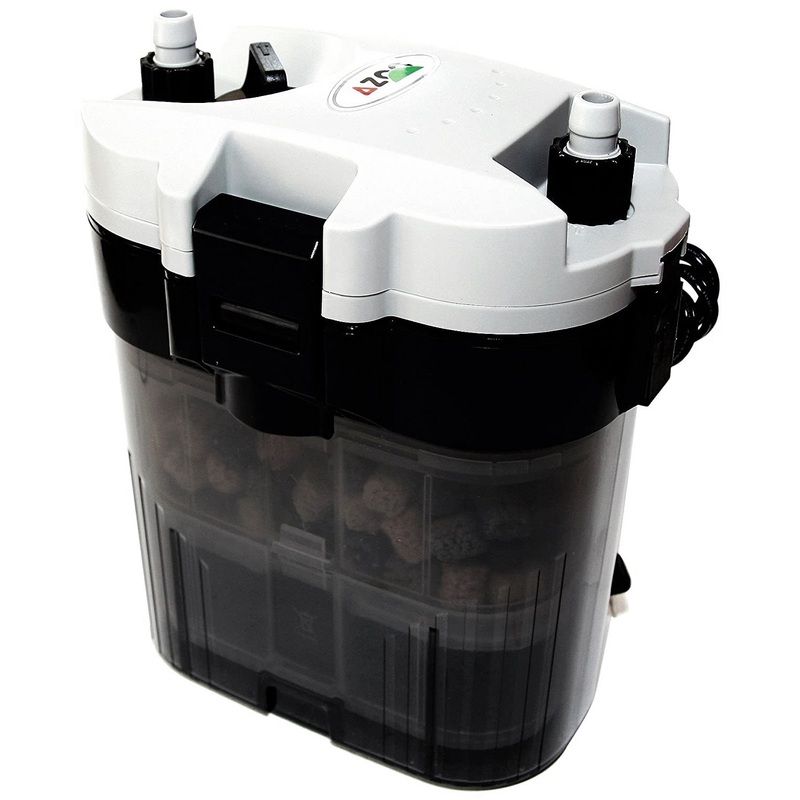
Sale! AZOO EXTERNAL POWER FILTER (Mini canister filter) up to 20 gallons
- $79.99
- $40.00
*This item is qualified for FREE SHIPPING to all 48 continental states! Additional shipping fees may apply for shipping to Puerto Rico, Hawaii, and Alaska.This filter can be used as a hang-on or external canister. Separate inlet & outlet design allows wate
- 100% Happiness Backed or Your Money Back
- Free Delivery on 30+ Orders
- 60-Day Hassle-Free Returns
*This item is qualified for FREE SHIPPING to all 48 continental states! Additional shipping fees may apply for shipping to Puerto Rico, Hawaii, and Alaska.
This filter can be used as a hang-on or external canister. Separate inlet & outlet design allows water to flow to and return without bypassing filter media for an optimized filtering effect.
The body is made of highly durable ABS plastic to prevent it from breaking easily. Sophisticated structure, complete accessories, easy assembly, and maintenance.
*We recommend this filter foraquarium sizes from3to10gallons.
FEATURES:
- Powerful motor and ultra-quiet design for a silent, smooth operation.
- Large capacity of filter media with high-efficiency output to increase filter volume for always providing clean water quality.
- The detachable water inlet/outlet design, easy installation, and maintenance.
- Energy-saving, environmentally friendly design, safe and reliable to use.
- Ideal for either hanging on the aquarium or placing on the table.
- Can be used for freshwater, or saltwater aquariums.
PRODUCT INCLUDES:
- 1 x Bio-mat
- 1 x Carbon pack
- 1 x Bio-Ring pack
- 2 x rubber hoses
- All pipes and connectors
SPECIFICATIONS:
- Power: AC110V (60Hz)
- Power Consumption: 7W
- Max Capacity: 360L/H
- Max lift: 70CM
- Chamber capacity: 2L
- Baskets capacity: 1L
- Hose size:12/16 mm
- Aquarium size up to 20 gallons *Suggested by manufacturer*
- Dimensions: 207x122x182mm
- Main material: ABS & PC
- Made in Taiwan
PRECAUTIONS:
- For safety use, please read the precautions carefully
and pay attention to the labels on the product.
- Before first use, check if the Voltage is appropriate
for the filter. Make sure the power plug is secure and
the socket is not shared with other appliances.
- The filter drum must be filled with water before being plugged into a power outlet.
Otherwise, the motor can easily be damaged due to empty running.
- Do not attempt to dismantle or repair the motor in the filter drum.
- If the power cord is damaged, please stop using the product.
- If the plug socket is positioned below the filter drum, please make sure, not to let the water come down along the power cord
reaching power socket.
- This filter is suitable for indoor aquarium use.
Water temperature range 10~35; maximum height 60 CM.
- Ensure the unit is unplugged before installing or cleaning.
- For use in a new aquarium, please operate the unit for
one day before introducing fish into the aquarium.
INSTALLATION INSTRUCTIONS:
A. Hang on to the aquarium
B. Set on the table.
Refer toandfor Installation.
(Filter media are included and loaded already in the filter drum)
- For Hang-on the aquarium
- Water Inlet Pipes Installing:
Connect Elbow Connector (M), Nut (L), to Inlet Pipe (Q1, Q2).
and Inlet Net (Q3) (Refer to Parts Assembly Drawing).
Fix Water Inlet Pipes with Suckers (R) to Sucker Stand-Long
(S2) and attach to the aquarium wall in a proper place
as shown in Fig (2).
- Water Outlet Pipes Installing: Connect Elbow Connector (M),
Nut (L), TPR Elbow (Short) (N) to Rain Pipe (P1.2). Users can
choose to use either the Outlet Port (P3) or Rain Pipes (P)
for different water outlet effects. Fix Water Outlet Pipes
with Suckers (R) to Sucker Stand-short (S1) and attach to the
aquarium wall in a proper place as shown in Fig (2).
- Set Hanging Hooks (U1) on the aquarium wall in a proper place.
Fix the Filter drum to the Hanging Hooks (U1) by Hanging
frame (U) as shown in Fig (3). Connect Water Inlet/Outlet
Pipes to filter drum with TPR Elbow (Long) (T) as shown in Fig (1).
(Please pay attention to the Water In & Out indications on the filter.)
- Fill in the filter drum with water as shown in Fig (5) and then
plug it in to start up the unit.
- For Stand on the table
- Assemble Water Inlet and Outlet pipes as shown and
explained in Fig (2) and in
- For Hang-On the aquarium above.
- Connect Water Inlet/Outlet Pipes to filter drum with
60cm Soft Pipe (X). (Please pay attention to the
Water In & Out indications on the filter.) Fix the 60cm
Soft Pipe(X) with Curve Clip(Y) to adjust to a proper place
as shown in Fig (4).
- Fill in the filter drum with water as shown in Fig (5) and
then plug in to start up the unit.
MAINTENANCE:
- Use a normal cloth to carefully wipe to clean the surface
of the unit. Never clean it with Gasoline or Cleanser.
- When there is an unusual sound or overheatingappears
during the operation, please stop to use the unit.
- Regular cleaning and replacement of the filter media,
Active Carbon Pad (B2), Bio Sponge (B1), and Bio Ring (W) are
necessary for better filtration results.
- Cleaning or Replacement of filters
4-1. Unplug the unit, remove Water Inlet and Outlet Pipes
(Be careful about the siphon effects) and then pull up the side
Clip (F2) and Clip (F1)
4-2. Press the hook as indicated in Figure (7) to take
apart Filter Lid (C) and Filter Cup (B) for cleaning or
replacing Active Carbon Pad (B2), Bio Sponge (B1), and Bio Ring (W).
|
VOLTAGE |
CODE |
REMARKS |
|
110V |
AZ95034 |
360 L/hr |
NOTES:
The display color of theitem and its packaging coulddiffer fromthe
actual productdue touses’ monitor’s settings.
Cost:
$25
Free Shipping:
We offer free shipping on orders over $30. Please check the free - shipping eligibility at checkout.
Delivery Time:
It usually takes [3-5] business days for standard shipping. Please note that this is an estimated time frame and may be affected by local holidays, and unforeseen circumstances.

Reviews
There are no reviews yet.